Ah, film. I love the medium. It’s a tangible form of photography; in essence, you’re catching photons in silver suspended inside gelatin. To be more precise, light-sensitive silver halide crystals are suspended in gelatin on a celluloid or acetate base. But how do you get an image out of this? How does this silver transform into a visible negative? How does film processing work?
The exposure process
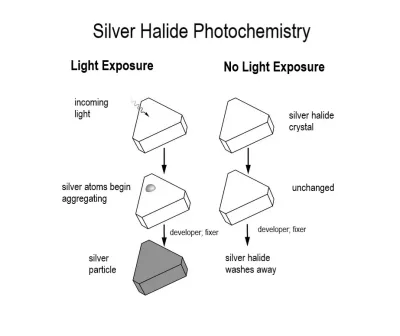
When you load film into your camera, it hasn’t been exposed to light. At this point, all the silver halides in the film remain as just that – silver halides. When you expose the film to light, a small speck of the halide becomes metallic silver, creating what’s known as the latent image. You only need four atoms of metallic silver on a halide to make it “active.”
Development: the heart of film processing
The heart of any film processing journey is development. (Do note that if you’re doing ECN-2 development, you should really remove the remjet before development 😉) During development, the latent image captured during exposure transforms into a visible negative or positive. The film is immersed in a developer solution, typically containing chemicals like hydroquinone or metol, which catalyze the reduction of the “active” silver halides into metallic silver. This chemical reaction forms the basis of the photographic image.
Fixing: ensuring image stability
Fixing follows development, offering stability to the final image by eliminating unexposed silver halides from the emulsion. The fixer solution, containing compounds like ammonium thiosulfate or sodium thiosulfate, dissolves these lingering silver halides, transforming them into soluble complexes that can be easily rinsed away from the film. Without this step, unexposed silver halides would remain on the film surface, gradually darkening upon exposure to light and changing the image. Fixing guarantees the enduring quality of the developed image, halting any further chemical reactions. Following fixing, the film undergoes a thorough washing process to ensure complete removal of any residual fixer solution, solidifying the longevity and steadfastness of the final photographic print or negative.
Special considerations for color film
In black-and-white development, the film moves directly from the developer to the fixer. However, color film processing requires an additional step between development and fixing called bleaching. Color film chemistry kits are usually more complicated than black-and-white kits. Color film’s image is formed by three different dyes: cyan, magenta, and yellow. A bleaching solution, containing compounds like potassium ferricyanide or ammonium persulfate, oxidizes the metallic silver, breaking it down into soluble compounds that can be easily washed away.
If you don’t remove the metallic silver during regular development, known as a bleach bypass, your negative will contain a black-and-white image overlapping the color image on each dye layer. This affects exposure latitude and saturation, but enhances contrast and apparent grain. Some motion picture films did this as an artistic choice, the most well-known being Saving Private Ryan.
The info on this page is simplified, but it should give you an idea of how film processing works and what happens inside nbtg’s lab when you ship your precious rolls of film to me for development!